Tutorial: How to Track Domain Type-In Traffic.
Quick Summary of Contents
- 1 Tutorial Pre-Requisites
- 2 Tutorial Overview
- 3 How to track domain type-in traffic.
- 3.1 Select a primary or secondary tracking domain.
- 3.2 Identify Google Analytics for tracking domain.
- 3.3 Set up web hosting for tracking domain.
- 3.4 Setup landing page for tracking domain
- 3.5 Forwarding domains to tracking domain.
- 3.6 View domain type-in traffic in Google Analytics
- 3.7 Using Primary and Secondary Dimensions to Understand Type-In Traffic
- 4 BONUS: URL shortener as an alternative domain type-in traffic option.
- 5 Closing Thoughts
One of the most elusive topics surrounding domain investing is type-in traffic. There are many schools of thought on this topic.
In short, I define and qualify domain type-in traffic as visitors typing a domain name into a web browser and landing a single web page (not a fully developed website) — completely bypassing search engines altogether.
Now many are quick to blur the lines between domain parking and domain type-in traffic. They are two different things, yet one relies on the other.
In this case, domain parking can rely on domain type-in traffic, but not exclusively. A domain can be parked and display ad links that visitors click on to generate domain parking revenue.
On the other hand, domain type-in traffic is simply the number of times visitors type in the domain into a web browser with no search engine help included.
Domain type-in traffic doesn’t automatically result in revenue, although it can if the destination offers products, services, or a call to action that is in alignment with the visitor’s expectation.
It doesn’t take long after entering into domain investing to hear about the heyday of early investors buying keyword domains for the avalanche of type-in traffic.
Most domain investors, especially those early in their journey, are fast on the hunt to discover undeveloped domain gems with thousands of visits daily.
Do domains with exponential type-in traffic, like in the days of old, actually, exist today?
And if they do exist, how and where does one go about discovering, measuring, and procuring such domains?
Truthfully, we are well outside of the hand-registration fee for those one-word domains you’re after. If you’re hoping to spend 1-2 figures for a domain that yields 5, 6, and 7 figures annually, it ain’t happening!
Sorry, I gotta keep it all the way real. No pie-in-the-sky dreaming here. That’s the bad news.
Now for the good news. Domains with type-in traffic that exist today are likely 2-3 words long. However, such domains won’t be near the elusive avalanche of type-in traffic per day you often hear about generating one-word domains.
But again, domains with type-in traffic do exist, and I aim to educate and share with you how to discover and measure such domains in a simple tutorial.
So, let’s get started!
Tutorial Pre-Requisites
Before you begin this tutorial, I highly recommend you have the following items nearby and on hand to streamline this tutorial:
- A web hosting environment supporting PHP 7.0+ (MySQL not necessary, but added bonus for later in the tutorial) — A2 Hosting, RoseHosting, GoDaddy, Bluehost, HostGator, InMotion
- Text editor (i.e., NotePad++, Sublime, Dreamweaver) or web-based file editor to edit .php files
- FTP Client (CuteFTP or FileZilla) or a web-based File Manager to upload files to a webserver
- A domain registrar that offers domain forwarding services (most do, and if yours don’t, then it’s time to find a new domain registrar)
Tutorial Overview
This tutorial aims to share the following:
++ How to track type-in traffic of domains in a personal domain portfolio
++ How to track marketing campaign(s) of secondary domains forwarding to your primary website or a customer’s website using Google Analytics
++ How to track rental/leased domain traffic
How to track domain type-in traffic.
The most critical step of tracking domain type-in traffic is ensuring the domain resolves to a landing page that can be tracked.
This landing page can be a primary or secondary website or 3rd-party solution offered by domain registrars (GoDaddy, Dynadot, Epik) or domain marketplaces (i.e., Efty, Dan.com, Sedo).
Select a primary or secondary tracking domain.
For the sake of today’s tutorial, we’ll focus on the primary or secondary landing page for bulk tracking of tens, hundreds, or thousands of domains. This landing page can be a primary or secondary domain of our choices.
I forward and track hundreds of SEO and search marketing-related domains to my primary domain KickstartCommerce.com.
For example, try typing InboundLinksForum.com into a new web browser tab. It should redirect to an article I produced a few years back entitled “Build Links and Increase Traffic Redirecting Expired Domains.”
The video below, also included at the bottom of the article, is the essence of today’s tutorial. The video is the shortcut or “CliffsNotes” version of this complete tutorial, should you be a bit impatient.
Nonetheless, the first step of this tutorial is to select a domain to track domain type-in traffic with. For this tutorial, I’ve registered TypeInTracker.com (how convenient, right?).
Now that you’ve registered a tracking domain for yourself or decided to use your primary website, it’s time to set up Google Analytics.
Identify Google Analytics for tracking domain.
Note: If you already have Google Analytics set up, installed, and configured on a primary website you’ll use to track secondary domains, then skip to the following section: Forwarding domains to tracking domain.
Visit Google Analytics, and create an account or sign in to your account.
If you already have Google Analytics installed and set up on your primary website, then simply identify your Google Analytics Tracking ID.
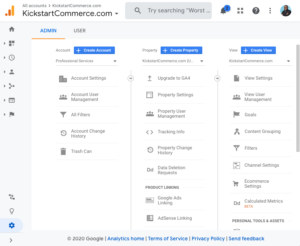
This Universal Tracking ID can be found by going to Admin > Account > Property > Tracking Info.
Click the sprocket or cog in the lower left-hand corner to display the Admin tab.
Select the respective Account and Property (or create a new Account and Property for your tracking or primary domain).
Under the selected domain under Property, click on Tracking Info > Tracking Code.
The Tracking ID, starting with “UA,” should be displayed.
Note: Copy the Tracking ID and codebase for implementation into the tracking codebase a few steps from now.
If you need to set up Google Analytics for your primary or secondary tracking domain, follow the step-by-step instructions to set up Analytics for a website (Universal Analytics).
If you are setting up Google Analytics for your primary website, then follow the aforementioned instructions to install the tracking code within your primary website.
If using WordPress for your website, then try MonsterInsights’ Google Analytics Dashboard Plugin (recommended) or ShareThis’ Google Analytics Plugin.
Now that Google Analytics is under our belt let’s talk about web hosting and setting up the tracking domain.
Set up web hosting for tracking domain.
Note: If you are using a primary website already hosted and live, skip to the following section: Forwarding domains to tracking domain.
While you can easily purchase and use shared, virtual private server (VPS), and dedicated (overkill) web hosting plans, I recommend and prefer a Managed VPS. Make sure whatever you purchase includes cPanel, FTP, PHP, MySQL, and FREE SSL offerings to host tracking domains.
I once used GoDaddy at one point in time as a primary web host. However, I now use A2Hosting and RoseHosting as options for myself and the customers I support.
A2Hosting is extremely affordable (especially when you purchase 2 or more years), yet they offer lightning-fast websites hosted on NVME — 10 times faster than traditional web hosting. They offer one-click upgrades and downgrades for storage, ram, and CPUs.
Rose Hosting, Bluehost, HostGator, Epik, and InMotion Hosting are other web hosting providers worth reviewing.
Once you’ve selected your web host provider, it’s now time to upload the simple landing page files for the tracking domain website to your web host environment.
Setup landing page for tracking domain
Note: If you are using a primary website already hosted and live, skip to the following section: Forwarding domains to tracking domain.
Using a landing page example from StartBootstrap.com, I’ve created a simple, responsive landing page for a tracking domain.
Of course, you can always use your own design and images — if you got the skills to pay the bills like that. 😁
The landing page is basically a grayscale design. When a visitor visits the tracking domain website (without a domain forwarded), the landing page displays the following:
When a secondary domain forwards to the tracking domain, then the landing page displays the following:
Note: Notice the difference in the URL in the web browser address bar between the two images. One simply displays TypeInTracker.com while the other displays TypeInTracker.com with appended Google Tracking Campaign ids for the secondary domain (i.e., hubpatrol.com) forwarding to TypeInTracker.com.
To set up the tracking domain landing page, I’ve included a typetintracker.zip to download and unzip/upload to the public_html directory of your web hosting environment.
[ Download TypeInTracker Files .zip ]
The file structure of the typeintracker.zip, when unzipped should resemble the following:
— .htaccess (file forces SSL on tracking domain; delete this file if you don’t want to use SSL)
— index.php
— robots
|___ assets
|___ img (contains all image files)
|___ css (contains all css files)
|___ includes
|___ apptop.php (edit this file)
|___ config.php (edit this file)
|___ general.php
|___ js (contains all javascript files)
There are a couple of files to edit on a local computer or once uploaded to your web directory. Use a text editor of your choice (see the pre-requisites section; Sublime is my favorite). The files to edit are apptop.php and config.php.
Editing config.php.
As for config.php, the magical brains of it all, you will need to edit the following variables with their respective values:
- $pageTitle – enter the name that you want to display as the web browser title at the very top of the web browser.
- $companyName = enter your company’s or website’s name to display to visitors.
- $companyEmail = enter the email address you would like to display for visitors to contact you.
- $companyPhone = enter the phone number you would like to display for visitors to contact you.
- $pageHeaderTag = enter the main heading of the page (e.g., Welcome text if default)
- $googleAnalyticsID = enter your Google Analytics Tracking ID created for the tracking domain (e.g., UA-1234567-89).
- $googleMedium = enter the specific medium name to display/track in Google Analytics (e.g., Domains).
- $googleCampaign = enter the specific campaign name to display/track in Google Analytics (e.g., Redirect).
<?php

//ini_set('display_errors', 1);
//ini_set('display_startup_errors', 1);
//error_reporting(E_ERROR);

// variables for index.php page
$pageTitle = 'Domain Type-In Tracker';
$companyName = 'Acme Company, LLC';
$companyEmail = '[email protected]';
$companyPhone = '512-123-4567';
$pageHeaderTag = 'Welcome';

// Set your Google Analytics ID
// Vist http://analytics.google.com/ to create your account
$googleAnalyticsID = 'UA-XXXXXXX-XX';  //EXAMPLE: UA-1234567-89

// Set Google Tracking Campaign UTM Parameters
// For demo/tools of Google Analytics Campagin URL Builder
// Please Visit https://ga-dev-tools.appspot.com/campaign-url-builder/
$googleMedium = 'Domains';
$googleCampaign = 'Redirect';

?>
Editing apptop.php.
The only items to edit in the apptop.php file are the $firstSentence and $secondSentence variables — if you care to change how sentences read. Both sentences include concatenated variables to edit at your own risk. 😉
Locate the following lines in apptop.php:
<?PHP

require("config.php");

include("general.php");

 // Returns the Google Analytics utm_source from forwarded domains
$siteURL = getSiteURL();

// sentences for index.php

$firstSentence = '<b>'.$siteURL.'</b> can be purchased, leased to own, or have traffic redirected to your primary website.';

$secondSentence = 'Contact '.$companyName.' at '.$companyPhone.' or via email at <a href="mailto:'.$companyEmail.'">'.$companyEmail.'</a> to inquire about pricing and payment plan options.';

?>
Once you enter the respective value for each variable to your liking, your new landing page is ready for testing.
If you haven’t already, upload all files included in the unzipped typeintracker folder to your web environment’s public_html directory using the web-based File Manager in cPanel (the easiest) or using an FTP client (i.e., CuteFTP or FileZilla).
If using an FTP client seems a bit daunting, then I recommend using your web host’s built-in web-based File Manager to upload files to the web server.
Below is what A2 Hosting’s cPanel displays to manage your website files.
Note: Notice the File Manager as well as FTP Accounts options.
Below is the page A2 Hosting’s File Manager displays via the web browser.
There are “+” symbols in the upper left corner of the image for adding Files and Folders and an Upload button that allows you to upload files.
Unfortunately, this interface doesn’t allow for the uploading of folders/directories. I recommend creating the directories first using the web-based Folder option, then using the Upload feature to add files to their respective directories.
Note: Notice I placed my files in typeintracker folder that’s inside of the public_html directory. I only did this due to hosting a large number of development websites in this web hosting environment.
If you only have a single tracking domain, then simply upload files to the public_html directory without the typeintracker folder/directory.
And should your web host not provide web-based File Manager service, then I highly suggest you change web hosts ASAP — after all, it’s the 21st century, time to get with the program. 😉
A2 Hosting’s Knowledge Base for cPanel File Manager.
If using an FTP client, you must ensure you’ve created FTP credentials. Google your web host followed by FTP, which should provide you with a basic how-to or knowledge base with step-by-step details.
A2 Hosting’s Knowledge Base for Using FTP.
How to manage FTP accounts and sessions in cPanel.
Below is a FileZilla screenshot displaying what it looks like to FTP files from my laptop (left side) to my web directory for tracking the domain (right side).
Simply select files from the left pane and drag them to the right window page to upload. You can also right-click on files/directories in either pane and select to upload/download files too.
If you need help using Filezilla, then I recommend the following video tutorial about using FileZilla FTP Client.
Forwarding domains to tracking domain.
Okay, you’re almost to the finish line of this tutorial and unlocking whether or not your domains have type-in traffic — more importantly, the origin and many other details about a given domain’s type-in traffic.
Once you have a primary website or a tracking domain lander live on the web with Google Analytics installed and tracking, it’s time to forward secondary domains to your primary or tracking domain.
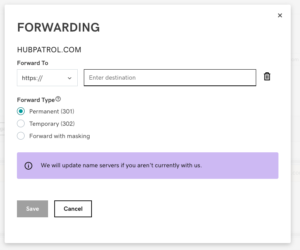
To forward domains, use your domain registrar’s forwarding service. For this tutorial, I’ll forward hubpatrol.com to typeintracker.com, as shown below in the GoDaddy Domain Manager image.
I simply selected hubpatrol.com from my list of domains, and the selected Forward > Forwarding Domains from the available menu selections.
Next, I set the appropriate Forward to protocol (i.e., http:// or https://) and then I enter the following address as the destination: www.typeintracker.com?utm_medium=Domains&utm_source=HubPatrol.com&utm_campaign=Redirect.
Once you enter the destination address with campaign tracking parameters appended, be sure to set the Forward Type to 301, and click Save.
NOTE: If you need help with creating a Google Tracking Campaign URL, then use Google’s Campaign URL Builder.
And that’s it! Simply wash rinse and repeat for all the secondary domains you desire to track using either the primary website or tracking domain.
Note: Allow domains to forward to at least 12 hours before data shows up in Google Analytics.
Speaking of Google Analytics, allow me to show you how to check to ensure your domains are being accurately tracked in Google Analytics.
View domain type-in traffic in Google Analytics
Okay, so let’s crack open another web browser and visit Google Analytics.
Once you’re signed in and have selected the primary or track domain to view analytics, then select Acquisition > All Traffic > Source/Medium from the menu on left side of page (see image below).
Do you see what I see? Look at position two near the bottom of the page under the Source / Medium column.
Well, what do we have there? Sure enough, there is “HubPatrol.com / Domains”. HubPatrol is the Source, and Domains is the Medium.
And no, I’ve not forgotten about Redirect being the Campaign. Under the same navigation menu under Acquisition, select Campaigns > All Campaigns.
Well, what do we have there? Yup, good ol’ Redirect as the Campaign as specified in the forwarding address of the previous section.
That’s it! You are now tracking domain type-in traffic simply forwarding your secondary domains to a primary or tracking domain landing page using Google Analytics.
You can also dive a bit deeper in data and understand more about visitor attributes (i.e., city, country, browser, device, etc.) using additional dimensions.
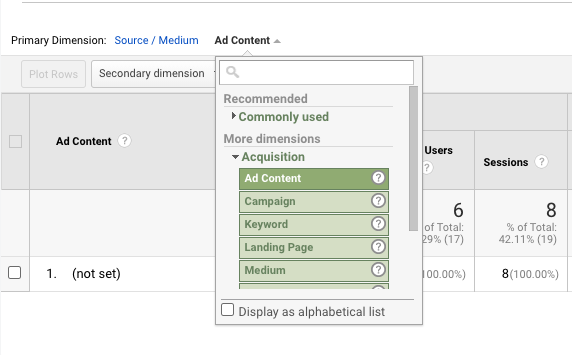
Additional dimensions can be found next to or under the Primary Dimension (see images below in the next section).
Using Primary and Secondary Dimensions to Understand Type-In Traffic
If you would like to see the Primary Dimension and Secondary Dimension at the same time, then choose Secondary Dimension as shown below and it’ll display both Primary and Secondary Dimensions to next one another.
In the example below, Hubpatrol.com / Domains now shows the City in the next column to the right.
To remove City, simply select another Secondary Dimension, or click the x inside the gray circle icon next to the selected Secondary Dimension inside its column.
If you would like to see a different Primary Dimension, then simply select Other to the right as shown in the image below.
A new column will appear with newly selected Primary Dimension. To return to previously selected Primary Dimension, simply click the blue linked text next to the selected Other Dimension.
Also, a Secondary Dimension can also be selected when selecting a new Primary Dimension.
BONUS: URL shortener as an alternative domain type-in traffic option.
And to add a few sprinkles and cherry on top of the ice cream sundae, here’s yet another trick to capture domain type-in traffic: url shorteners.
If setting up web hosting is a bit bewildering for ya, then use a url shortener like bit.ly.
That’s right, url shorteners can also be used to track type-in traffic. In fact, url shorteners are often used on domain traffic leases.
The domain owner desires insight on the traffic while a domain is actively leased and simply forwarded to a customer’s primary website.
Note: This method of tracking doesn’t work if the customer desires to have DNS forwarded to their web server, using the leased domain as their primary website.
But rather than be in the dark on whether or not a given domain receives type-in traffic, you could easily use a URL shortener like bit.ly or ow.ly should the step-by-step process above technically challenge you to no end.
Nonetheless, watch the video below to learn more about domain lease metric tracking and tracking domain type-in traffic using url shorteners.
Closing Thoughts
Well, that’s it for this tutorial! I hope you have a better idea of the many ways to go about tracking type-in traffic for your domain portfolio.
There is no reason for anyone to be in the dark on whether or not their domains receive traffic, and, more importantly, the where and who the traffic derives.
Oh yeah, and before I forget… If you’re really up for a challenge, then you could also add additional functionality to this codebase to store the secondary domain in a database with an external url that redirects to another website.
Here’s an example, type in AustinEstatePlans.com into a web browser.
I’m able to track domain type-in traffic for AustinEstatePlans.com in Google Analytics using my tracking domain (DNRedirects.com). I simply store AustinEstatePlans.com in a database and associate it with IbekweLaw.com.
The DNRedirects.com landing page code performs the database lookup and simply returns the redirect URL. I load the redirected URL into the following HTML code for the landing page redirect:
<meta http-equiv="Refresh" content="2; url=https://ibekwelaw.com/about?utm_medium=Domains&utm_source=AustinEstatePlans.com&utm_campaign=Redirect" />
That code lives in the header section of the landing page, and is only visible when a domain redirect url is returned from database lookup. Otherwise, the landing page will not redirect to a 3rd-party website for customer.
But with a little elbow grease and PHP/MySQL, the sky is the limit on where you can take this tutorial.
In closing, let me know if this tutorial was helpful to and for you. Do leave a comment below.
Also, please don’t hesitate to contact me should you encounter any technical challenges along the way. 😉
Thanks and happy tracking of domain type-in traffic! 🎉


